BACK

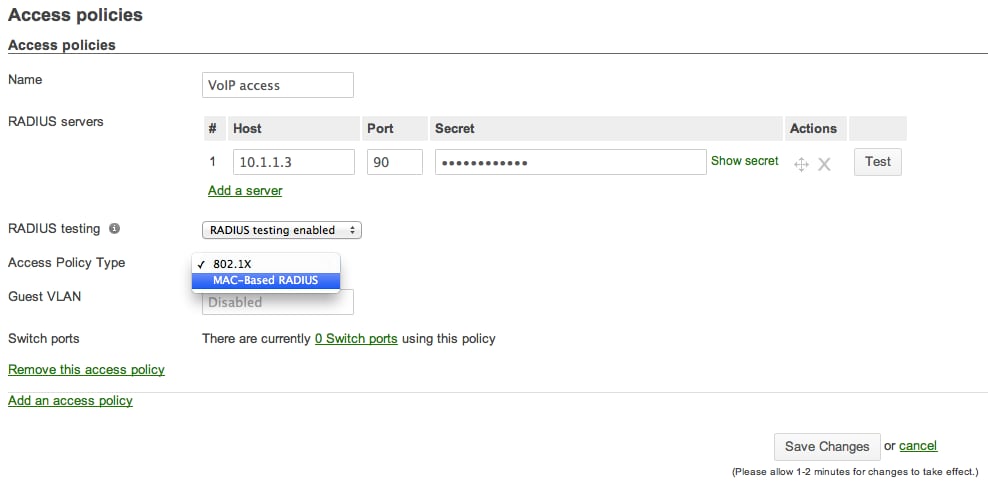
Along with the introduction of the Cisco Meraki cloud-managed 802.11ac access point, the MR34, there’s a lot of buzz in the industry around 802.11ac. After all, it’s the next generation WiFi standard, and brings significant speed improvements to WiFi networks. To help you better understand the technology, here are four key points you should know about 802.11ac.

Speed increases significantly for new clients that support 802.11ac

802.11ac increases the maximum data rate for a single client quite a bit compared to 802.11n. Most of the first 802.11ac access points use triple-stream MIMO, similar to today’s top-end 802.11n access points, but will have a maximum data rate of up to 1.3 Gbps. The increase comes from using 80 MHz channels and a new modulation scheme (256 QAM). As the technology matures, the maximum data rate will further increase by taking advantage of even more MIMO streams, but that won’t come for some time.

Figure 1: 802.11 maximum data rates

Note that the above figure compares 802.11ac 80 MHz channels with 802.11n 40 MHz channels.


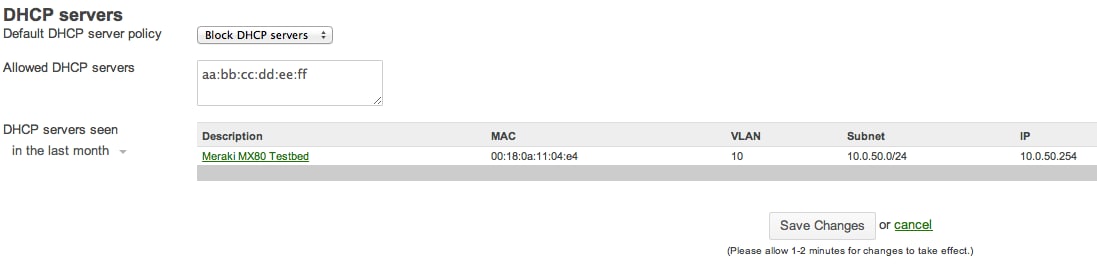
802.11ac only works on 5 GHz

Yes, 802.11ac will only work on the 5 GHz band. Nearly every wireless client supports the 2.4 GHz band, but unfortunately the band suffers from high interference levels and is quite crowded. In nearly all environments, the 5 GHz band doesn’t suffer from as much interference or crowding as the 2.4 GHz band, and 5 GHz has more spectrum available for WiFi channels. 802.11ac channels will be 80 MHz wide (compared to the 20 MHz or 40 MHz channels of 802.11n), with the option to spread out to 160 MHz channels in the future, although at double the channel bandwidth compared to 80 MHz, there will only be half as many channels.

The figure below compares channels of 20 MHz through 160 MHz bandwidth in the lower half of the 5 GHz band.


Figure 2: 5 GHz channel bandwidth comparison


802.11ac is backwards compatible with 802.11n

802.11ac falls back to 802.11n to serve clients that don’t support 802.11ac. This works very similarly to how 802.11n falls back to serve 802.11b/g and 802.11a clients today. Dual-band APs like the MR34 will seamlessly serve 802.11ac and 802.11a/n clients in the 5 GHz band, and 802.11b/g/n in the 2.4 GHz band. Backwards compatibility is a key point since nearly all deployments will be dual-band and therefore will need to support 802.11n for years to come.


802.11n will be around for a long time

Over the course of this year we’ve seen 802.11ac clients and APs come to market, but it will be some time before 802.11ac becomes most new laptops and some smartphones support it. Due to the backwards compatibility of 802.11ac with 802.11n, and because 802.11ac is limited to 5 GHz only, 802.11n will still be around for years to come. Already today, 802.11n is widely used to support rich services such as voice, video conferencing, and video streaming.

There are other exciting developments in 802.11ac, such as multi-user MIMO (MU-MIMO) and closed-loop beamforming, but they will take more time to become widely adopted by access points and clients. In the meantime, we’ll keep you up to date on important news as 802.11ac moves forward.

BACK

Yes, it’s finally here! We are excited to announce our blazing fast 802.11ac access point, the Cisco Meraki MR34. Here is a first glance at the hardware and a snapshot of features we have already developed. But first, a quick look at what makes the MR34 so much faster than its 802.11n relatives.

802.11ac: lightning fast

The MR34 takes advantage of the latest and greatest WiFi standard, 802.11ac. We have jumped from 802.11n speeds of 450 Mbps to almost 3 times faster with 802.11ac, topping out at 1.3Gbps. Keep in mind, 802.11ac only applies to 5 GHz, so the MR34 uses a combination of 802.11ac and 802.11n on 5 GHz bands and 802.11n on 2.4 GHz bands for a combined data rate of 1.75 Gbps. So, what makes 802.11ac so fast? There are a couple major things contributing to this speed boost.

The first is wider channels. Instead of the 40 MHz channels used by 11n, 802.11ac takes advantage of 80 MHz channels. The 5 GHz frequency band didn’t get any bigger, 11ac is just using a bigger chunk of the available bandwidth in order to boost throughput. 802.11ac even takes into account existing 802.11a and n clients by allowing them to transmit on 20 or 40 MHz segments of the same 80 MHz blocks used for 802.11ac traffic, enabling seamless backward compatibility.

Another element contributing to the performance improvement is an enhanced modulation technique, called 256 QAM. Think of modulation as the amount of data pushed through a pipe at a given time. 256 QAM allows for a greater density of information to be transmitted than was possible with 802.11n (64 QAM). We can now transmit more information in the same amount of time and through the same pipe, providing more efficient transmission.

The MR34: not just a pretty face

Beyond the 802.11ac speed enhancements, there is another major differentiator for the MR34. In addition to the 2.4 GHz and 5 GHz client serving radios, the MR34 packs a 3rd radio to make it the most secure AP on the market. The dual band 3rd radio operates in full-time scanning mode, powering Auto RF which optimizes the RF environment as well as securing the air waves with the built in Cisco Meraki Air Marshal technology. We can even use the 3rd radio to provide real-time granular view of the 2.4 and 5 GHz spectrum giving administrators a comprehensive understanding of the RF environment.

 Real-time RF spectrum tools now built into the Cisco Meraki dashboard

As with the entire MR family, the MR34 comes with network visibility tools, as well as layer 7 firewall and traffic shaping functionality built right into the AP. The MR34 enforces traffic shaping policies at line rate, even at faster 11ac speeds for complete network control. Stay tuned for more blog posts that go into the details of these enhanced features and more.

Integrating with existing wireless networks

Cisco Meraki makes it easy for customers to take advantage of this new technology. All Meraki products use the centralized cloud dashboard for configuration, management, and monitoring, and the MR34 is no different. The MR34 includes the fully integrated, out-of-the-box feature set which is common to all the MR access points, with secure guest access, BYOD support, traffic shaping, Presence location analytics, and more. The MR34 integrates seamlessly into your existing wireless network and is completely backward compatible with 802.11 a/b/g/n.

We have even gone further to think about your switch infrastructure. For wireless networks that use PoE switches to power APs, the MR34 can operate in low power mode at standard PoE (802.3af) or crank it up to PoE+ (802.3at) to take advantage of the enhanced 3rd radio functionality.

Get the full scoop

The MR34 will be hitting the streets late this summer to early fall at the list price of $1,399, but you can get a first look into the hardware and feature set at the MR34 webinar next Tuesday. Also, check out our 11ac page for more info about the MR34 and how it fits into your wireless network.

BACK

Last week, Facebook Product Managers Erik Tseng and Joanna Lee joined Cisco Meraki Wireless Product Manager Raj Krishna for an interactive webinar on how to provide an integrated WiFi sign-on platform using Facebook.

The highlight? In two mouse clicks, you can create a splash page that lets users check-in to your business page in exchange for free WiFi, instantly providing access to your current news and deals.

What else can you do with Facebook WiFi? Not only can you offer exclusive deals to your loyal customers, but you can also learn more about the clients connecting to your network to create a better user experience and promote engagement. It’s also one less password to remember, one less hassle for your customers, and the easiest way to create a lasting connection.

Below are some of the frequently asked questions during the webinar.

How can an organization offer different deals to regular WiFi users v. those who login using Facebook WiFi?

You can do this by using two SSIDs, one for Facebook WiFi users and another for regular WiFi users. Cisco Meraki Access Points can broadcast up to 15 SSIDs so you can customize your needs across many different types of users.

Check out Facebook’s “Offers” page for how to create deals for users on your Facebook WiFi SSID: https://www.facebook.com/help/www/410451192330456?rdrhc

On your regular WiFi SSID, use the EXCAP api to offer promotions to users.

Where do I get a banner to advertise Facebook WiFi?

A banner designed by Facebook advertising free Wi-Fi is available here: https://docs.meraki.com/display/MR/Facebook+Login

What if my organization doesn’t have a Facebook account?

You’ll need to create a Facebook Page for your organization in order to use Facebook WiFi with Cisco Meraki. More information on how to create a Facebook Page is available at https://www.facebook.com/help/364458366957655/.

What happens if a business has several locations?

A valid location is required for Facebook WiFi usage. If a business has several locations, a Facebook page can be created for each of these. Check out Facebook’s Parent-Child structure if you have 5+ locations: https://docs.meraki.com/display/MR/Facebook+Login

Will enabling Facebook WiFi in your Cisco Meraki dashboard automatically create a Facebook business page for those that don’t already have one?

No, Facebook requires businesses to create their own page. A valid location is required to use Facebook WiFi and this is defined by the business page admin, along with other custom information.

Do users have to “Check in” or can they bypass that step?

Users who connect to your SSID using Facebook WiFi will be prompted to check in using their Facebook credentials. You can allow users to skip this step by giving them open access or requiring them to input a password of your choosing, created in your Facebook page settings.

Can you require users to “Like” your page in addition to checking in?

While you cannot require a WiFi user to “Like” your organization’s Facebook page, they will be automatically prompted to do so after checking in.

How do you ensure security?

We take security very seriously at Cisco Meraki. Cisco Meraki offers a number of tools that enable administrators to ensure the security of their network as well as the information of the users that connect, including Level 1 PCI compliance and an out of band architecture. You can find out more at merakiupdate.wpenginepowered.com/trust.

How do you deny Facebook use for employees, but allow access for guest users?

You can confine employee devices to a particular SSID with restricted access to Facebook or any number of applications. Then create a separate SSID specifically for guest access with Facebook WiFi.

What encryption methods are needed for Facebook WiFi login?

Open, encryption-free association is required for Facebook WiFi.

Are there other splash page sign-on methods, besides Facebook WiFi?

Yes, with Cisco Meraki, you can create custom captive portals, walled gardens, and splash pages that allow users to continue straight to their destination, require further authentication, or route through specified pages. More information is available at https://docs.meraki.com/display/MR/Splash+Pages.

Still curious? Check out the recording and the slides here!

BACK

One of the most compelling benefits of cloud networking has to be the ability to troubleshoot technical issues remotely. Network engineers out there know that obtaining packet captures, an essential tool in the troubleshooting arsenal, can quickly consume time and money when supporting remote offices. Traditionally, an engineer needs to be physically present where the data is moving in order to “tap the wire” and capture detailed traffic for analysis.

In 2012 we solved this problem by giving engineers the ability to take detailed short-burst packet captures on any device in any location served by Cisco Meraki equipment. Combined with our remote cable testing feature, packet capture in the Cisco Meraki dashboard makes it far simpler to support networks on branch sites where dedicated IT resources may not be available.

The basic results of packet captures can be presented directly in the dashboard, but for more thorough data analysis, a .pcap file can be downloaded onto the engineer’s computer and opened with software like Wireshark (formerly known as Ethereal). If you haven’t worked with one before, you’ll be amazed at the detail contained in a .pcap file. It reveals everything that is passing through—from soup to nuts.

Now we’ve gone a step further and removed the need for local software by working with a new cloud service called CloudShark. Detailed packet captures can now be displayed directly in a web browser on any device.

Selecting CloudShark

Using CloudShark with Merkai is super easy. By default, any capture sent to the service is immediately viewable in the browser on CloudShark’s own website. If you’re already familiar with Wireshark, you’ll be right at home here. Here’s a sample :

Example Cloudshark Capture

If all of this detail looks overwhelming, the service includes analysis tools for helping you find that elusive needle in a haystack.

CloudShark Analysis Tools

CloudShark also offers the option to host its software locally on your own server. This provides significant additional benefits, useful in larger organizations where many captures may be taken routinely and there may be a requirement to retain this data for future use or compliance purposes. With CloudShark’s Appliance software you can

  • Build a searchable repository of capture files
  • Tag captures to associate them to a location, device or trouble/support ticket
  • Annotate packets and captures
  • Securely collaborate on encrypted packet captures
  • Manage user access, even integrating with LDAP/AD

Setting up an Appliance is easy, just download it and install. Add the URL and unique API token to the Cisco Meraki dashboard, and all captures will go directly from the Cisco Meraki cloud to the CloudShark Appliance, encrypted all the way from your Access Point, Security Appliance, or Switch.

BACK

Last week we made the trip to San Antonio, Texas to present Cisco Meraki solutions for education at ISTE 2013, the nation’s largest conference for educational technology. Our booth this year featured a few stations for 1:1 demos as well as a truly massive TV screen for presenting the Cisco Meraki dashboard to larger audiences. As hundreds of people stopped by the booth each day, we saw a lot of interest in our wireless access points, and we also had our security appliances and switches—including the new 8-port model—on display. As always, Systems Manager, our free tool for cloud-based MDM, was a big hit among schools and districts in need of a simple yet powerful way to manage BYOD or 1:1 devices in their classrooms. Be sure to check out Meraki.Cisco.com/K12 to see more about how Cisco Meraki works for education environments.

Here are some photos of the booth and the team at ISTE! Head over to our Facebook page to see the full album.


BACK

If you’re a K-12 educational organization, we debuted several useful features to help protect your network back in April. One of these is the ability to choose the overall reach of content filtering on your MX security appliance. In essence, you can choose to filter top sites in a given blockable category, or you can choose to filter the entire category list.

Cisco Meraki collaborates with Webroot BrightCloud for best-in-class content filtering on our security appliances (we subscribe to all of their blockable categories). Enabling “Top Sites only” in the Content Filtering dashboard page will cause your MX to download and cache a database of top URLs from BrightCloud. The MX will check each website request against this local database, filtering if required. This gives you rapid, in-box filtering with a reasonable trade-off in URL coverage.


Easily choose the scope of content filtering on your Cisco Meraki MX.


If you choose to filter the full category list, the MX will initially check each website request against its cached database as before, but unmatched URLs will prompt the MX to make a dynamic lookup to the Cloud. This effectively allows your MX to filter billions of URLs. Although there will be some initial latency with cloud-based lookups, the MX caches the results, speeding future queries. This speed boost comes because web browsing is often habitual (people tend to view a subset of commonly-accessed sites), so after some initial latency common sites will be rapidly served to end users via the cache.

As always, you can also manually specify specific URLs and URL patterns to whitelist or block, regardless of which category list size you prefer.


BACK

If you’re trying to secure your organization’s switch infrastructure, we’ve got great news for you: Cisco Meraki switches now support

  • MAC-based RADIUS authentication

  • DHCP server containment

  • MAC whitelisting

MAC-based RADIUS authentication

All Meraki MS switches support 802.1X wired authentication, which allows the configuration of port-based access policies by using user credentials for authentication, but until now our switches didn’t allow for device-based policies. Furthermore, not all devices support 802.1X authentication, limiting the security scope of the port-based approach.

Enter MAC-based RADIUS authentication. When enabled, this feature requires authentication for each MAC address accessing a switch port. Now, you can dictate port access at the device level, enabling more granular control.

Enabling MAC-based RADIUS authentication in a policy to be applied to specific ports.

DHCP server containment

MS switches now perform DHCP snooping to identify which devices are responding to DHCP requests on your network, so you can automatically detect and block unauthorized, rogue devices. Configuring a DHCP server policy is easy. Simply set a policy to allow or block identified DHCP servers, then specify any exceptions to the rule. In the image below, for example, we’ve blocked all DHCP servers by default, except for our authorized server with MAC address aa:bb:cc:dd:ee:ff—this helps secure us from rogue DHCP servers which may be added to the network at any time.

Configuring rogue DHCP server containment for a Cisco Meraki network only takes one click.

MAC whitelisting

MAC whitelisting is valuable for networks that aren’t hosting an on-site RADIUS server. Enabling the feature in this case will block all access to a switch port except for the specified MAC addresses. Branch retailers, for example, might find MAC whitelisting useful if they wish to allow only certain devices on their network but don’t want to manage the added complexity of a RADIUS server.

Additionally, you may want to allow specific devices to be whitelisted through a switch port even though MAC-based authentication is required. If you normally enforce device-level authentication on a particular port but wish to make an exception for the CEO’s personal laptop, you can now easily do so.

Enabling MAC whitelisting for selected ports.

This new set of features can help you lock down Layer 2 access to your network, and refine policies on a per-device level.

These enhancements will be generally available during the first week of July as we roll out our next switch firmware update. If you would like earlier access to these features you can call Support to enable them in your switch network.

For more information on our MS line of switches, including some recently announced new models, check out our MS family datasheet or our website.


BACK

The notion of most employees using their personal devices for work is practically a foregone conclusion. Instead of resisting this trend, responsible IT organizations see BYOD as a means to boost employee productivity and take advantage of today’s always connected lifestyle. But what happens when a company’s sensitive information gets into the wrong hands? What happens if a device goes missing or an employee leaves the company? While BYOD can be liberating, there are important security implications for every organization to address.

When employees bring their mobile devices into the workplace, they tend to use resources like email, the corporate network via WiFi or over VPN, shared documents on servers, and enterprise apps.

These uses set the stage for a key question about how corporate IT thinks about mobile security: How can you remove access to those resources without completely wiping the device or affecting personal data on the device?

Selective Wipe

With the new Systems Manager selective wipe feature, we provide the “easy button” to address this challenge. Selective Wipe removes everything previously pushed to the device through the Cisco Meraki Systems Manager dashboard, including configuration profiles, apps, and documents.

Selective wipe provides a new way to remove secure data from lost or stolen devices

A device that has been selectively wiped is still enrolled in the Systems Manager network, so location tracking and over live tools will remain functional but the corporate provisioned data and settings are removed. This is a convenient way to handle employee devices that are missing or stolen, since IT will be able to track the device if and when it reconnects to the internet.

Auto-Quarantine on Enrollment

We’ve also introduced a second capability to increase security when devices are enrolled into a Systems Manager network. With the new auto-quarantine feature, IT has the option to explicitly approve enrolled devices before they receive any configuration profiles and mobile apps.

Auto-quarantine is easily configured to enhance security in the enrollment process for all new devices.

With auto-quarantine, organizations can allow users to self-enroll into a Systems Manager Network, while maintaining strict control over network access credentials, or sensitive apps and data that would otherwise be automatically pushed to newly enrolled devices.

Administrators have one-click access to authorize newly enrolled devices or to selectively wipe data

Bring on BYOD

With these new additions Cisco Meraki Systems Manager continues to make it easy to support BYOD while providing flexibility fo varying security needs. And as always—we’re excited to bring all these feature to you 100% free! If you haven’t already tried Cisco Meraki Systems Manager, try it here and get started today.


BACK

We’ve got some great tools for managed services providers (MSPs) who offer Cisco Meraki’s wireless, switching, security appliance, and MDM as a service to their end customers. These tools address common MSP challenges around managing end customer networks, optimizing costs, transitioning customer networks to a hosted service quickly, and scaling those networks as needed.

Today, we’re excited to announce additional, new features for MSPs:

  • MSP Portal: A central location for staff to monitor all of their Cisco Meraki end customer networks over the web
  • Support ticketing: Create, monitor, and respond to support cases with Cisco Meraki staff
  • Custom branding: MSPs can brand the Cisco Meraki dashboard and summary reports to reinforce their brand message to end customers

These new features, combined with the built-in end-­to-­end visibility and control provided by Cisco Meraki’s cloud management platform, provide powerful ways for MSPs to keep their customer networks up-­to-­date and centrally managed.


MSP Portal

The new MSP portal, built into the Cisco Meraki dashboard, gives MSPs a single location to evaluate end customers’ licensing compliance and networked devices.

Easily manage licensing compliance and end customer network devices using the MSP Portal.

From the MSP portal page, click into any of your managed customer networks and use Cisco Meraki’s Live Tools to remotely troubleshoot appliances; or use the dashboard to monitor users, devices, and application traffic, set group-­based policies, update licensing, and manage customers’ device inventory. You get end-­to-­end visibility of your customers’ networks from any Internet-accessible location—whether that’s at a NOC/SOC or your field offices.


Support ticketing

Keeping track of support cases across multiple end customer networks can be daunting, but we simplify things with a central location to create, monitor, and respond to troubleshooting tickets alongside Cisco Meraki staff. Cases are organized so that sorting cases by end customer—even down to individual customer networks—is easy.

Sort troubleshooting tickets by priority, status, case number, date created, or support engineer.

With Cisco Meraki support ticketing, you can keep track of relevant emails, files, and case descriptions for a particular problem within a single ticket and prioritize cases based on severity.

Custom branding

As the networking provider and primary support for end customers, MSPs need the ability to reinforce their brand message when administrators access the network. As part of the MSP Dashboard, Cisco Meraki will work with our partners to put a custom logo on both the main dashboard and summary emails that are sent to end customers.

Cost optimization

Reducing operational costs is a key challenge for MSPs, who must typically build out end customer network infrastructure, adjust for vendor licensing costs, and provide tech support for issues that arise. With Cisco Meraki, our cloud­-hosted management infrastructure eliminates the need for MSPs to build out data centers or host wireless LAN controllers and similar infrastructure. Our simple licensing scheme, which includes all product tech support, maintenance, and feature updates, streamlines cost models. Finally, our intuitive, cloud­-based dashboard allows engineers to remotely troubleshoot devices and reduces staff training hours.

On-­demand scalability

It’s easy to quickly transition end customer networks to Cisco Meraki. All of our gear allows for zero­touch configuration, with no onsite IT staff needed for deployment. Adding network devices is as simple as entering an order number into the Cisco Meraki dashboard—there is no device limit, throughput limit, or backend configuration necessary. Our datacenters are designed from the ground up to scale your customers’ networks to millions of attached devices—and we have built­-in redundancy across multiple geographies, all with a 99.99% uptime SLA.

If you’d like more details on these new MSP features—and additional benefits Cisco Meraki provides vis­-à-­vis managing end customer networks—please read our new MSP white paper.

BACK

Onboarding BYOD or company-owned devices into your MDM platform can be quite a challenge.  But if you’re using a Cisco Meraki wireless network, you’ve got a new and easy method to get those devices up to speed: Systems Manager Sentry. Cisco Meraki wireless access points can now check to see that devices are enrolled in Systems Manager before allowing access to an SSID and direct a user to self-enroll before accessing the network. Systems Manager is our 100% free tool for mobile device management that doesn’t require any other Cisco Meraki networking products, but if are using it along with our wireless gear, you’ll see the benefits of integration.

Without the help of Sentry, administrators would constantly be playing catchup, trying to onboard each new device walking through the door. Systems Manager Sentry can take that burden off of the shoulders of IT administrators and pass it to the end user. To gain WiFi access, end users will need to enroll their devices into Systems Manager, bringing along the access policies and network settings defined by IT, ensuring a secure and reliable network environment. To learn more about the capabilities of Systems Manager, check out the product page.

How it’s configured

Navigate to the Access Control tab of your wireless network in dashboard.  Select an SSID, and select Systems Manager Sentry from among the splash page options.   As a best practice, we don’t suggest enabling SM Sentry on open Guest SSIDs because you might start monitoring the devices of guests that unwittingly installed Systems Manager in order to gain WiFi access. We’ve turned on Sentry at our office for the “Meraki-BYOD” SSID.

Configure Systems Manager Sentry on your wireless network through the Access Control settings

How it works

What happens when a user tries to connect to the Meraki-BYOD SSID? The Meraki access point will scan iOS and Android devices for enrollment in Systems Manager. If the device is enrolled, welcome to Meraki-BYOD!  If not, iOS and Android devices will be directed to install the Systems Manager profile. In addition to Systems Manager using SSL as a secure communication channel, it uses SCEP to assist in secure installation.

Devices will be directed to enroll into Systems Manager before joining the network

Users will follow the two-step process and then will receive access to the SSID.  Systems Manager settings will be applied to the end user devices, ensuring important security and access policies are in effect when BYOD devices are on your organization’s network.