When packets need to leave their own subnet to find their destination they need a map to show them the way. These routes can be manually defined using a static route which works great until a manually–defined destination router becomes unavailable, at which point the traffic flow drops. Dynamic routing protocols address this obvious flaw by automatically learning how to reach known destinations, and the most popular of these is known as OSPF (Open Shortest Path First).
As we announced back in June, OSPF is being rolled-out to our Layer 3 switches, so now would seem the perfect time to cover the essentials of this powerful routing protocol. We’ll go on to explore how Meraki has – once again – taken the pain out of configuring and running a complex networking environment comprising multiple subnets.
The first popular dynamic routing protocol used in Local Area Networking was RIP (Routing Information Protocol), which used the simple criteria of hop count (how many routers must I pass through to reach my destination) to select a route, but suffered from inefficiencies and scaling issues. A smarter solution was needed, and OSPF became that solution. Let’s walk through a high-level review of the fundamental components of the OSPF protocol.
Route Selection
Back in the 1950s, a Dutch computer scientist by the name of Dijkstra invented an algorithm which calculates the shortest path between any number of nodes which become ‘neighbors’ once a learning process is complete. This algorithm has many practical uses and has been applied in a number of ways, including robot movements, military planning, and commercial shipping. The key benefit is the ability to take into account a number of criteria when determining the path with the lowest ‘cost’, for example, the speed of flying packages in an airliner versus sending by container ship, the price of fuel, the number of ships which can fit through the available shipping lanes, and so on.
The Dijkstra algorithm applies well to the world of networking, and for this reason it formed the basis for route selection in OSPF when the protocol first emerged at the end of the 1980s. Paths to learned destinations are selected based on bandwidth/link-type or can be manually selected.
Link States and Adjacencies
When a router (or routing switch) enables OSPF it sends out a hello on all interfaces with OSPF enabled. Other routers in the vicinity will receive these and (as long as they’re configured to get along) will then form an ‘adjacency’ with their new neighbor. Once this adjacency is established, routers will then exchange link-state advertisements and learn the common network topology in which they sit. From this they are then able to derive a routing table using the Dijkstra SPF algorithm, enabling efficient communication between subnets.
This ‘link state’ approach is a far more efficient use of network bandwidth than RIP, where entire routing tables are flooded throughout the network regularly. With OSPF, other than a regular hello (heartbeat) packet, only changes in the availability of routers (links) will trigger a refresh of the link state database and the routing table. Timers are implemented for how frequently a hello is sent out by OSPF–enabled routers, and a dead timer is also configurable, depicting when a router should be considered out of service, triggering a respin of the SPF algorithm.
Areas
Another great efficiency of OSPF is its use of areas, essentially logical groupings of routers, the routes from which can be summarized before being passed into other areas. An OSPF domain, or autonomous system, always begins with Area 0, also known as the backbone area. In a relatively small LAN, Area 0 may be all that’s required, but as a network grows, multiple areas can be created around this backbone. The beauty of scaling to multiple areas is that link state updates only need provide information relevant to their own area, without having to know the entire autonomous system’s routes, which saves on bandwidth and CPU cycles on the routers. The topic of areas gets complex and there are multiple types, but essentially they are the way in which OSPF can grow to considerable scale, potentially running an entire global private WAN.
Implementing OSPF the Meraki way
Our engineers and User Interface (UI) designers take great pride in the clean, accessible look and feel of the Meraki dashboard. Incorporating a complex protocol into such a UI was no mean feat, and took some time to get right. The priority was on providing the controls which would enable Meraki–to–Meraki dynamic routing, but also crucially, the ability to interoperate with routers and routing switches from the traditional Cisco family and others.
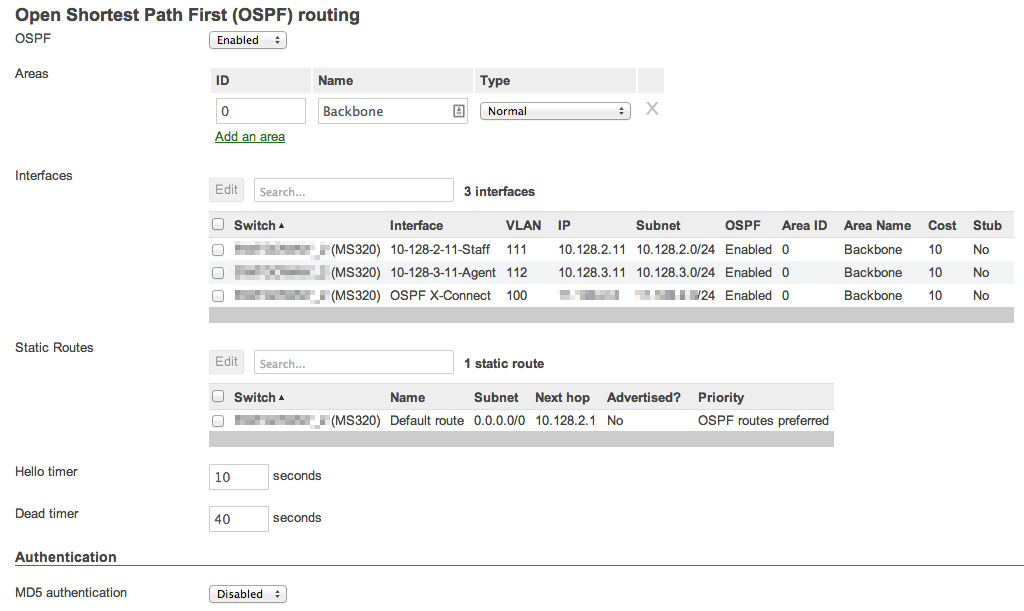
This screen grab captures all the OSPF settings available. Now that we understand the fundamentals of OSPF, these will make sense:
For our more OSPF–savvy readers, Meraki’s implementation is based on OSPF v2 and supports Normal, Stub and Not–So–Stubby area types. Also notice the option for MD5 authentication, which enables routers to securely identify one another prior to forming adjacencies.
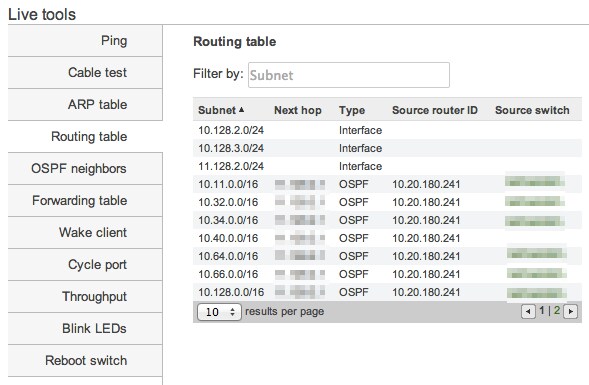
Once OSPF is enabled, the network admin will need a way to monitor things, so we’ve enhanced the switch live tools which appear when Layer 3 routing is enabled. Firstly, the routing table will now show which routes have been learned via OSPF (as opposed to statically defined), and the source router ID – a unique identifier within an autonomous system – and switch from which the route has been learned. Where that switch is a Meraki one it will be shown as a hyperlink, enabling the admin to jump straight to that switch’s view:
Finally, the OSPF neighbors can be displayed. Note the search function which exists throughout the Meraki dashboard and greatly assists in quickly locating a desired object:
We’re looking forward to enabling our customers to supersize their networks. As is always the case with the Meraki dashboard, the look and feel will evolve over time in response to the feedback we receive, particularly utilizing our ever popular Make–a–Wish box.
If you’d like to discuss our OSPF implementation with others, our online community of Meraki users and enthusiasts is a great place to try.