With its sleek packaging and clean lines, receiving Cisco Meraki gear in the mail can be exciting and thrilling — one thing it doesn’t have to be is daunting.
In fact, we sat a friend, not a Meraki employee, down with nothing more than this guide, a laptop, and a Cisco Meraki access point to see how long it would take someone with little to no networking experience to fully set up their own wireless network. The result? A simple wireless network, setup in 30 minutes. See for yourself…
GETTING STARTED
Creating a Cisco Meraki dashboard
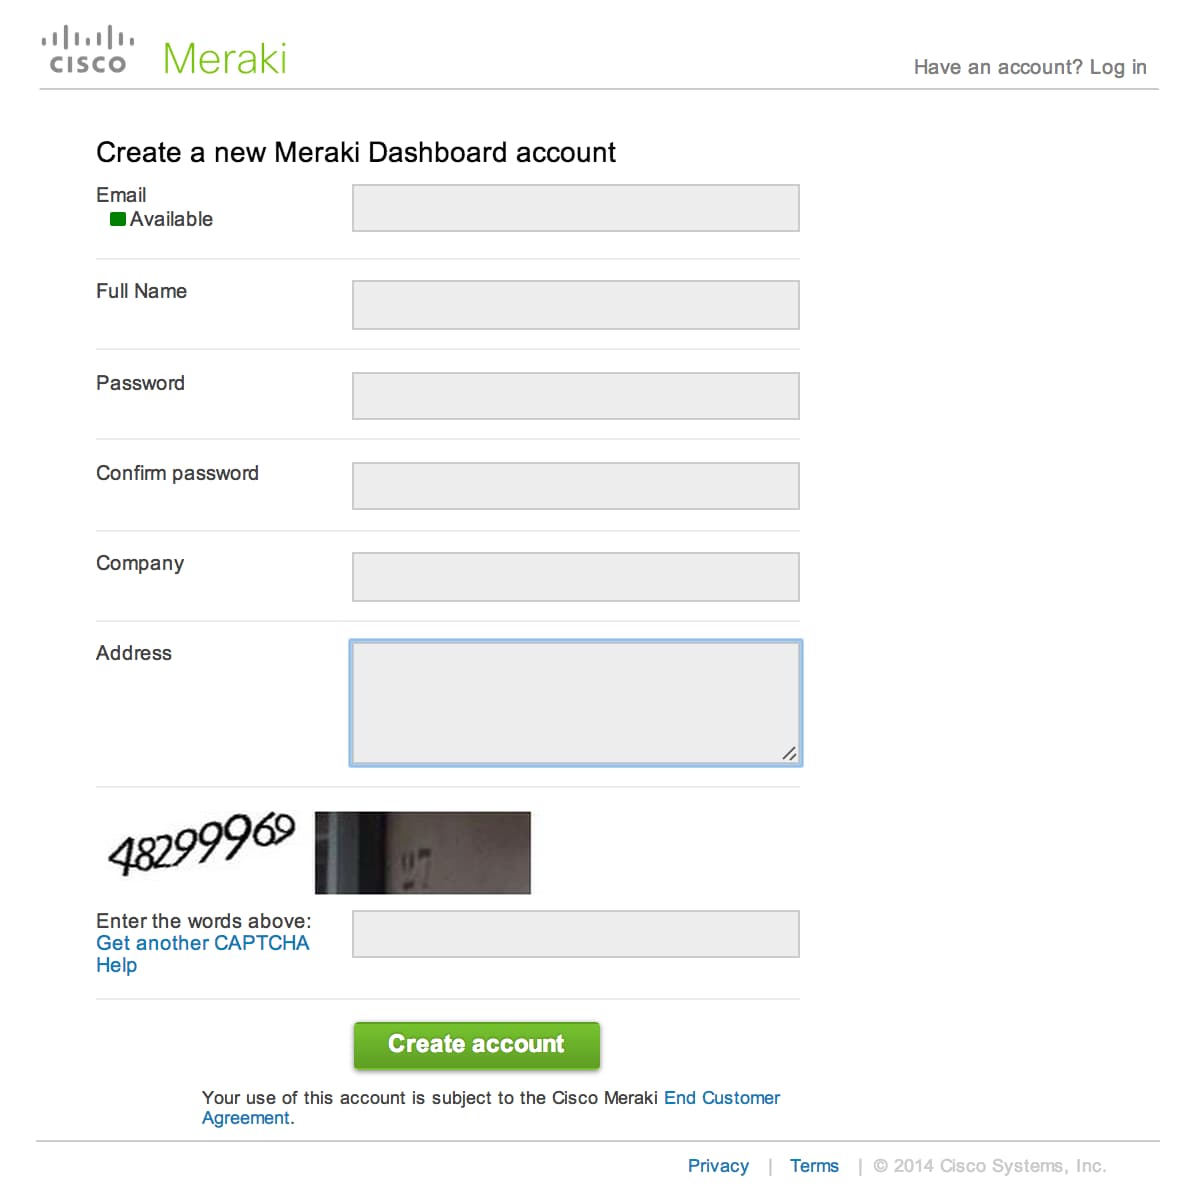
Before opening the box or plugging in the device, you’ll need to create your own Meraki dashboard account at dashboard.meraki.com by selecting Create an account and filling out some basic information. The Cisco Meraki dashboard is not an appliance, but a cloud-based service providing unified management of all Cisco Meraki devices, constantly monitoring, optimizing, and reporting on your network.
Adding devices to dashboard
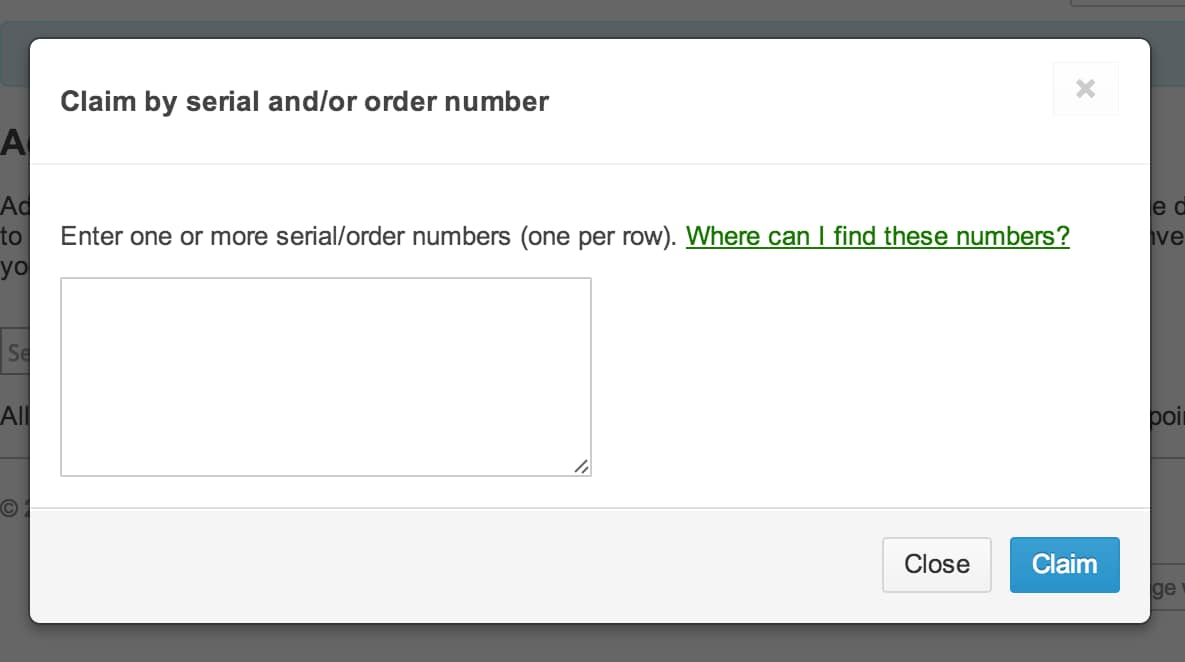
The next screen gives the option to add devices by providing the device’s serial number or the order number. If you have multiple devices, entering the purchase order number will propagate the dashboard with all the devices in that order. If you already have a dashboard account created or have advanced past this prompt, you can also add devices by navigating to Configure > Add devices, clicking Claim, and again entering either the serial number or the order number.
BASIC CONFIGURATIONS
Now that the devices have been added to the dashboard, it’s time to make a few initial configurations. These will ensure proper communication from your access point to the Internet and the Cisco Meraki cloud, provide admin access to authorized users, and allow effective management and reporting capabilities.
Obtaining an IP address
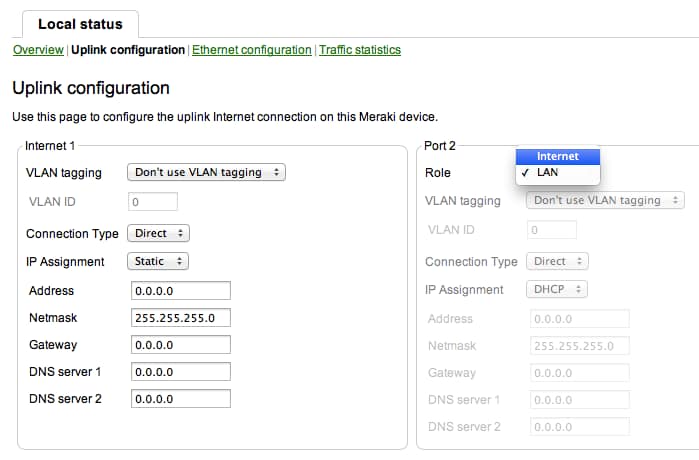
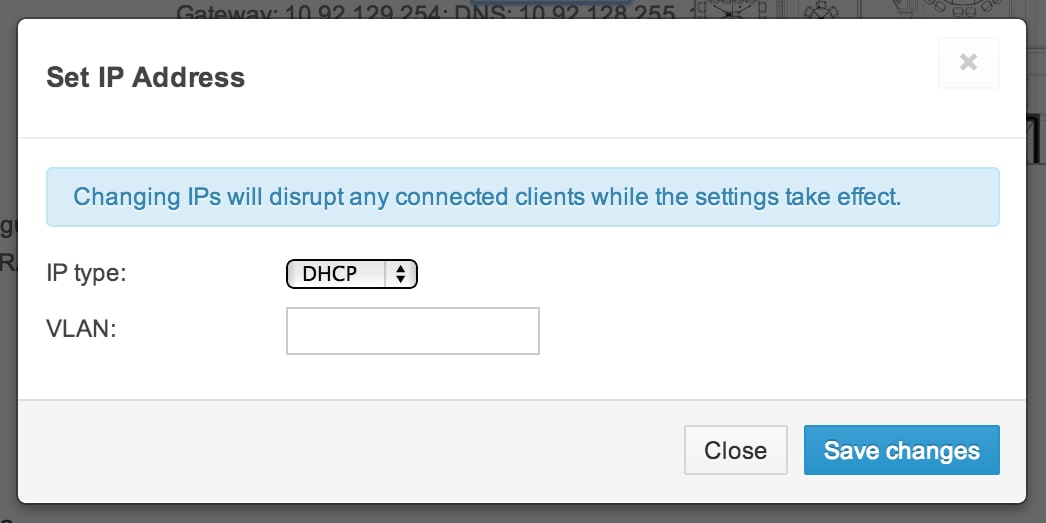
Sometimes it’s necessary to make changes in order to connect to the Internet. When connected to a Meraki AP or directly downstream from one, my.meraki.com provides local configurations for Cisco Meraki access points. Here admins can perform basic troubleshooting and set static IP addresses for uplink interfaces (It’s also possible to set a static IP address from dashboard if needed).
Cisco Meraki APs are set up to use DHCP out of the box. By clicking into an AP from the the Monitor > Access points page, IP address information is available and can be changed by clicking set IP address.
Opening firewall ports for dashboard access
The next step is to ensure that the proper protocols and ports are permitted on the firewall side to allow secure communication to the dashboard. If a firewall or gateway exists in the data path between Cisco Meraki devices and the cloud-managed dashboard, communication will be hampered until these configuration changes are made.
Adding admins for role-based dashboard access
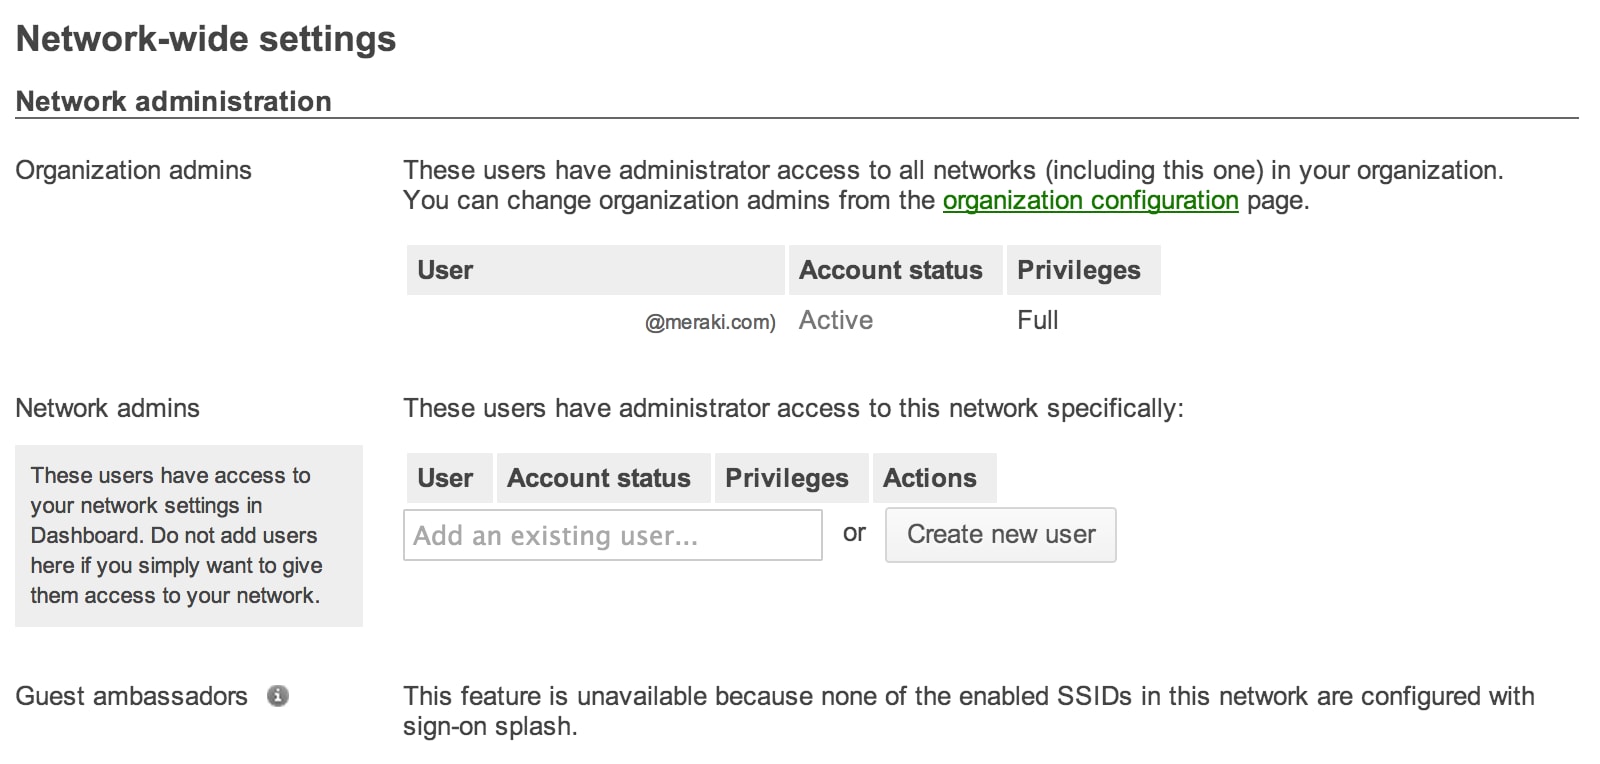
It’s typical that more than one person will serve as a network admin and will therefore need access to all or certain parts of dashboard. There are various levels of dashboard access to choose from and by navigating to Configure > Network-wide settings, it’s simple to add new admins under the Network administration section, customizing what they can control and view. A further scroll down on the same page, to the Network alerts section, provides the option to send various alerts to all admins or just certain ones.
PLUG AND PLAY
With the basic setup completed in dashboard, it’s now time to unbox, plug in, and start using that new AP.
Booting up the AP
Included in the box is mounting hardware for installing the AP in an optimal location. However, before mounting it high on a wall, it needs to be plugged in and have the above configured dashboard settings downloaded. This process simply entails plugging a CAT5 Ethernet cable into the AP’s uplink connector. If powering the device via a PoE enabled switch port or PoE injector, that’s all there is to it. Otherwise an A/C adapter will be needed.
Once plugged in, the AP will automatically attempt to connect to the dashboard to download its configurations and run a self-diagnostic. During this time, the LED light on the device will provide a colorful light show, ultimately settling on solid green or solid blue light (depending on whether clients are associated) if connected properly.
Adding APs to the map or a floor plan
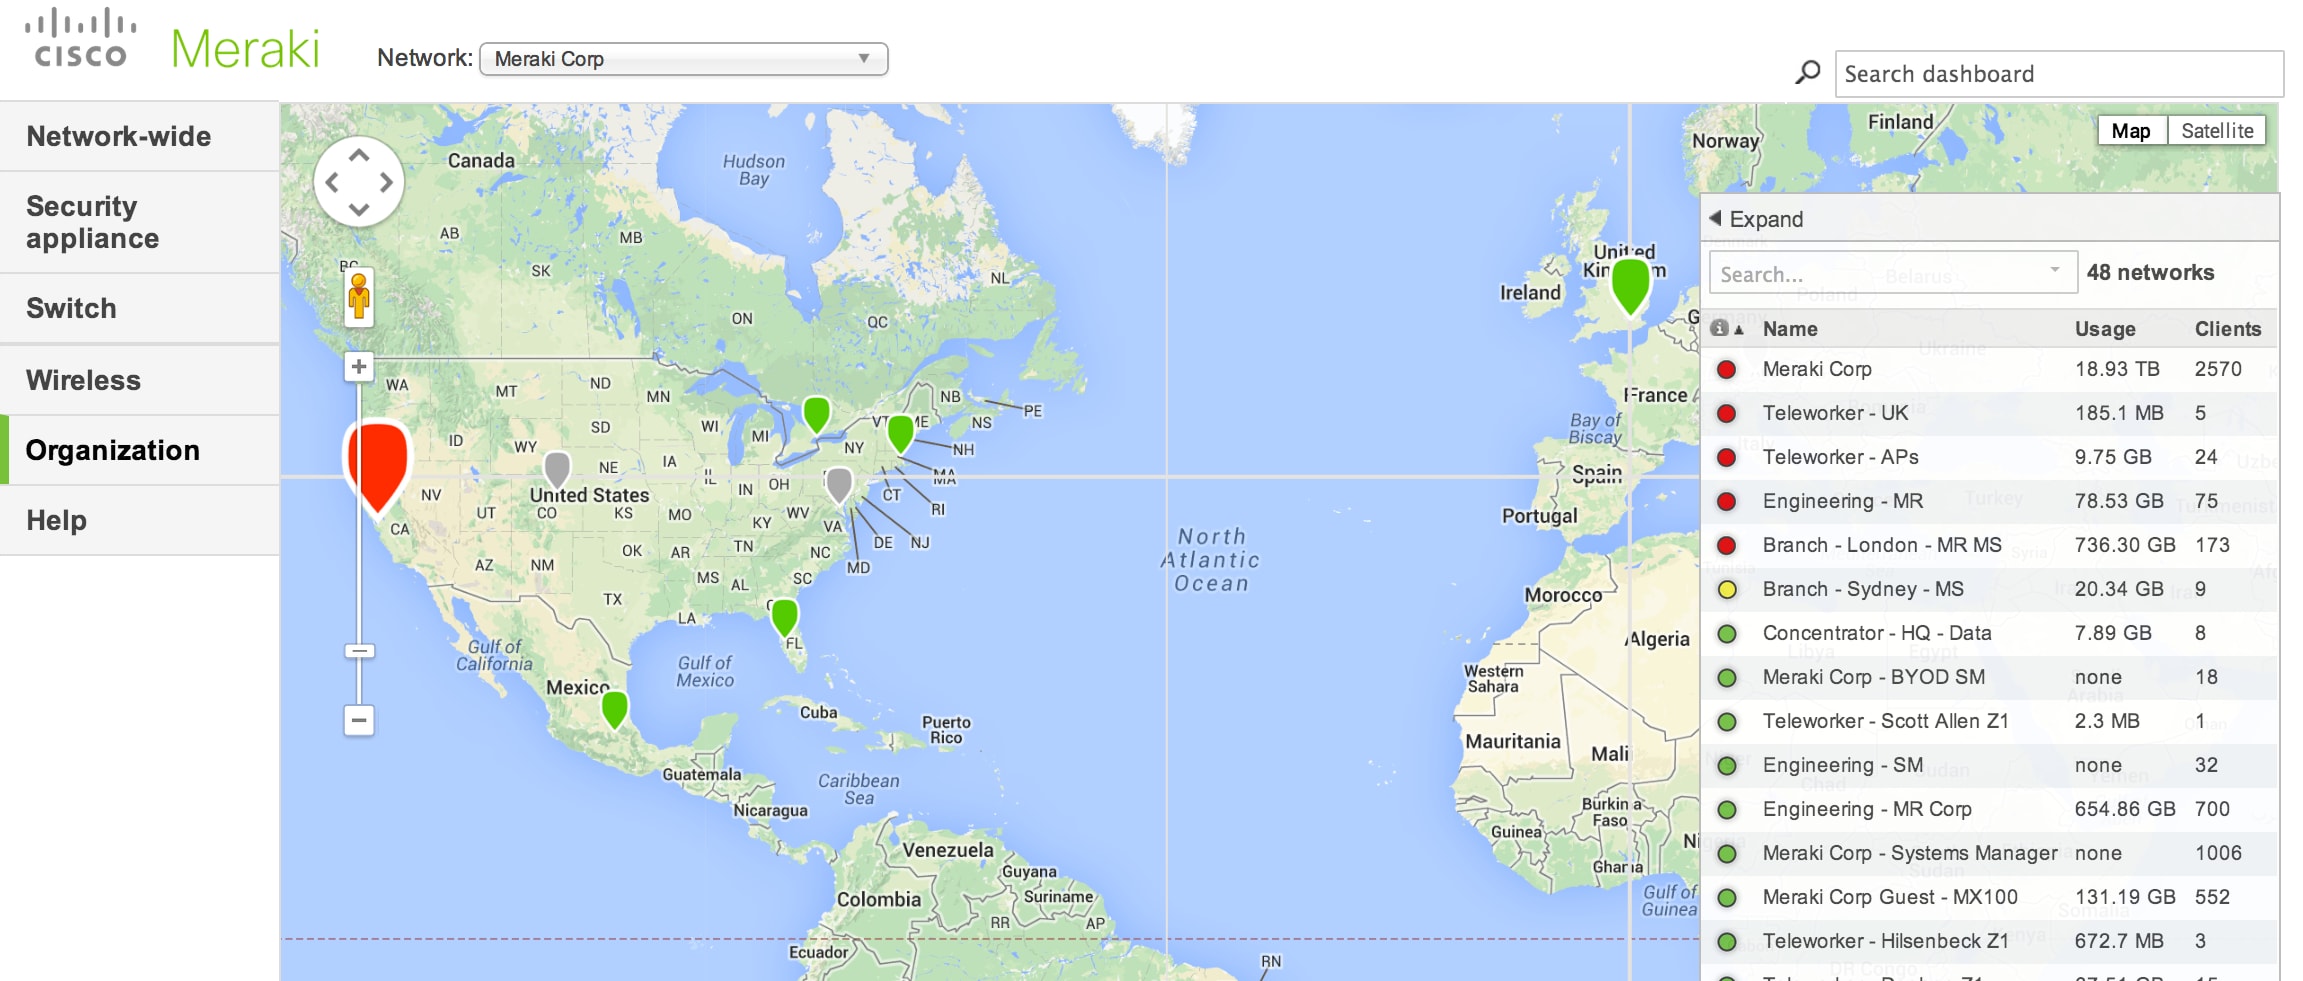
While it’s simple to keep track of one AP, placing the device(s) on a map in dashboard provides quick, high-level information on the health of the networks and of all the devices in your organization.
There are two different ways to visualize your deployed APs. The first is through the integrated Google Maps feature where APs can either be dragged and dropped onto the map (navigate to Monitor > Maps & floor plans and select Place APs on map). Or they can be placed by entering in the location’s address (navigate to Monitor > Access points, select the AP, and click on Edit configuration).
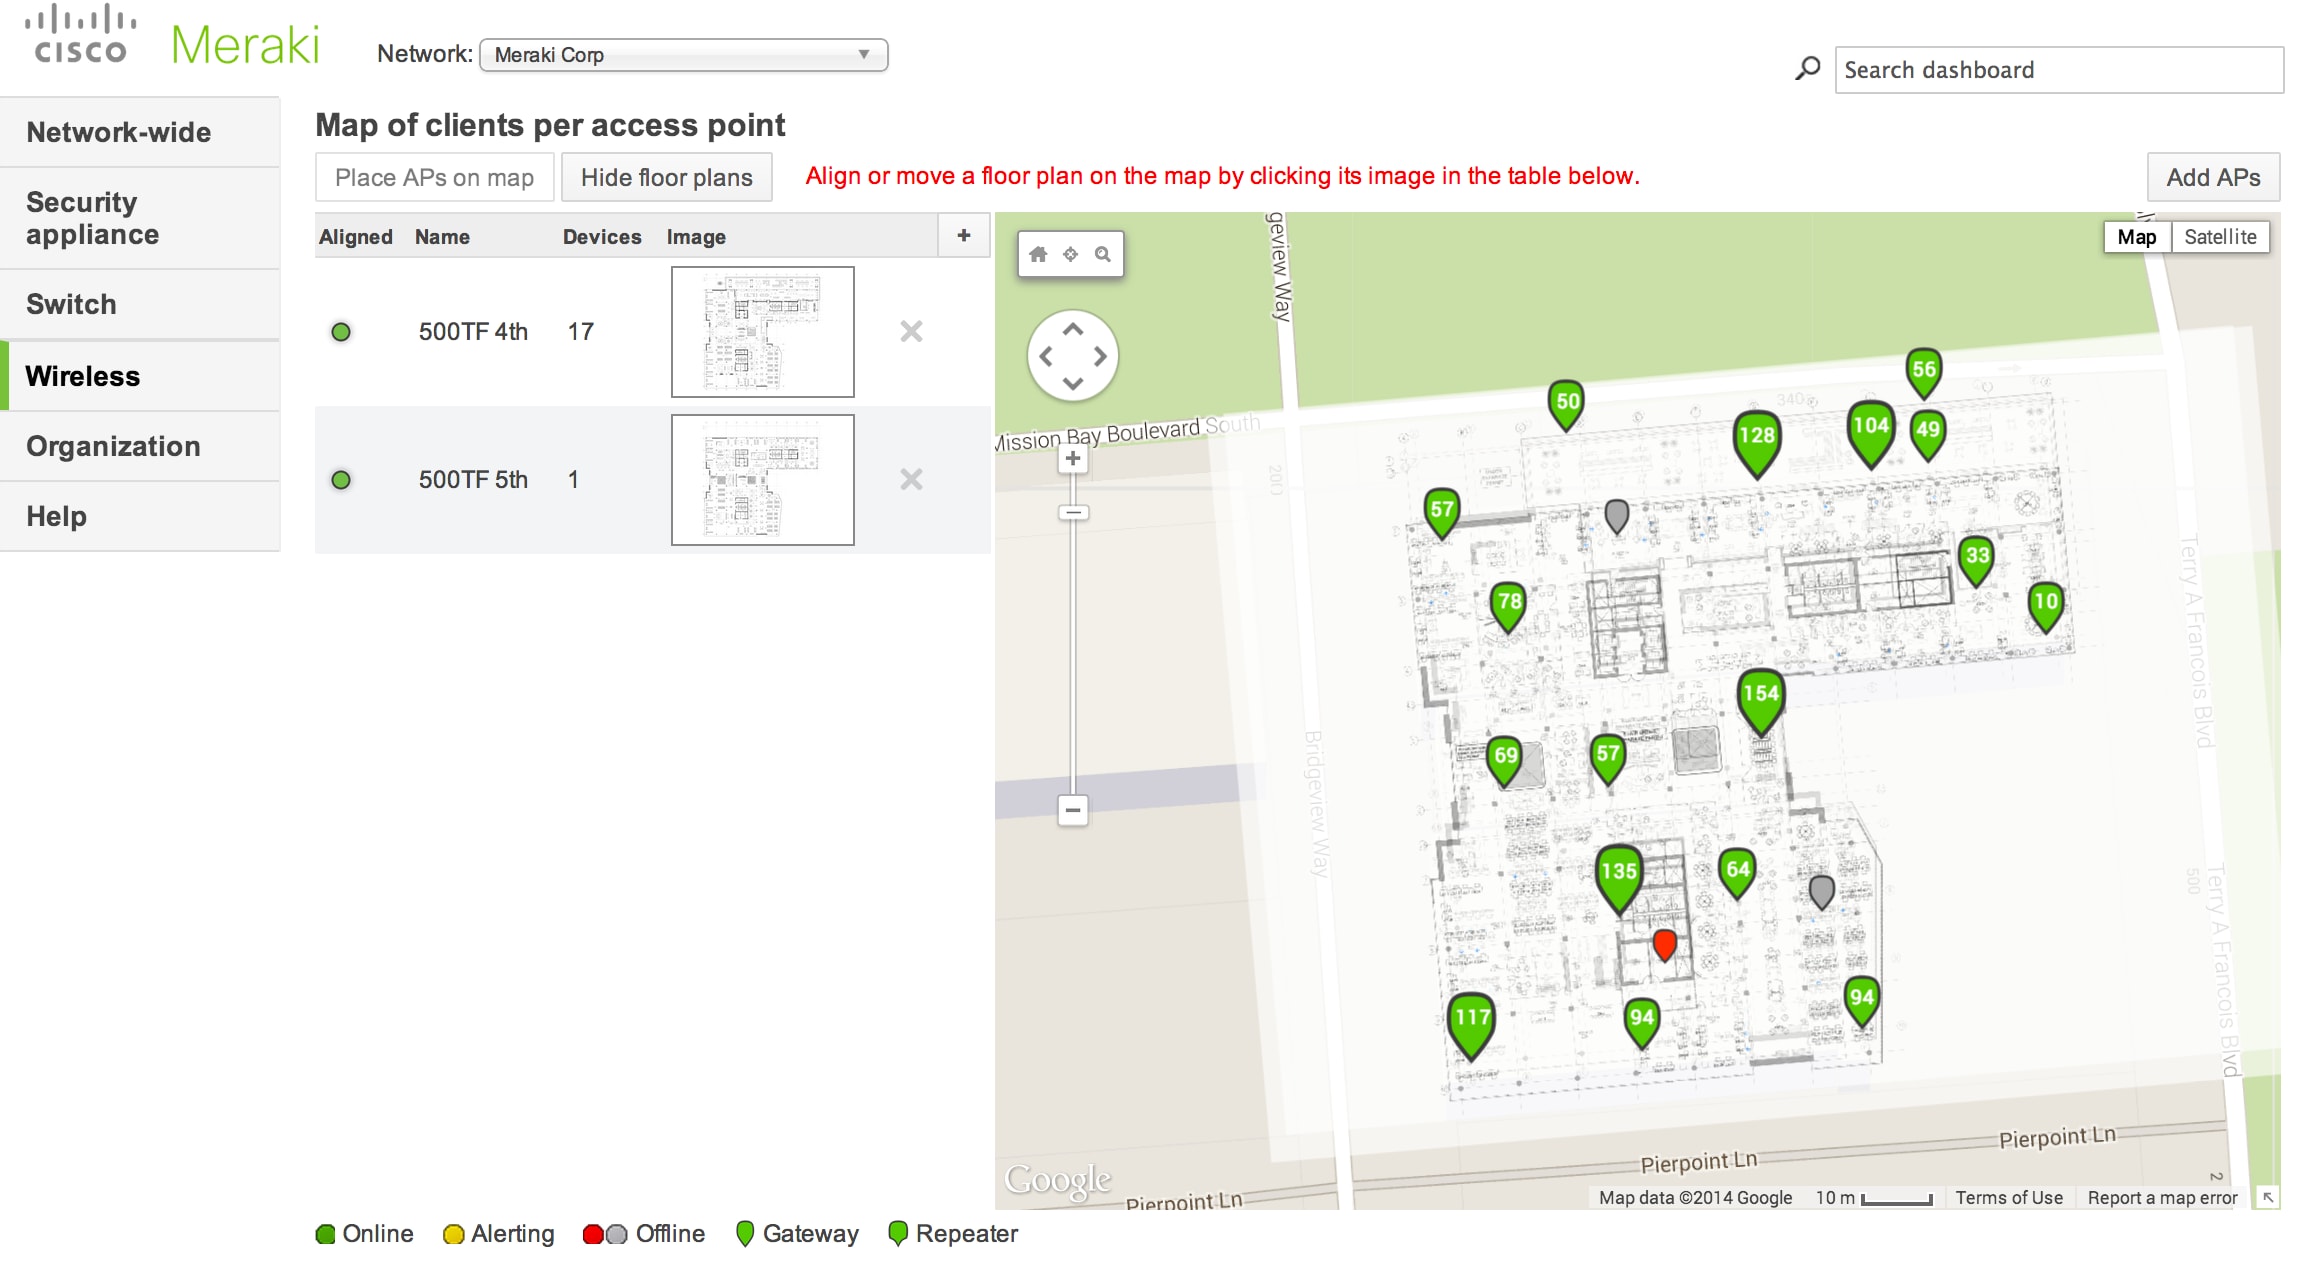
The second way is by uploading a custom map or floor plan that allows a more customized monitoring experience. This is done quickly by navigating to Monitor > Maps & floor plans and selecting Edit floor plans. Clicking the + that appears prompts the upload of a floor plan file whose position will be overlaid on the map and can then be adjusted to fit the physical location. Adding APs to the floor plan is done by selecting Place APs on map and dropping on the location.
Tagging and renaming APs
APs can also be tagged by location or even renamed depending on needs. This is done on the Monitor > Access points page. Tags are useful for grouping by building, broadcasted SSIDs, or floor. Simply select any number of devices and choose the Tag drop down menu. APs can either be assigned using existing tags or can be assigned a newly created tag. By clicking into an AP from the same page and selecting Edit configuration, the AP can be renamed for easier management or reporting.
ESTABLISHING WIRELESS SETTINGS
Once a wireless network is up and running, it may be desirable to implement additional custom configuration settings to meet your evolving needs. Creating SSIDs with authentication requirements, establishing firewall and traffic shaping rules, and allowing discovery of devices like Apple TVs are just some of the settings that can be implemented quickly and at any time!
Creating SSIDs
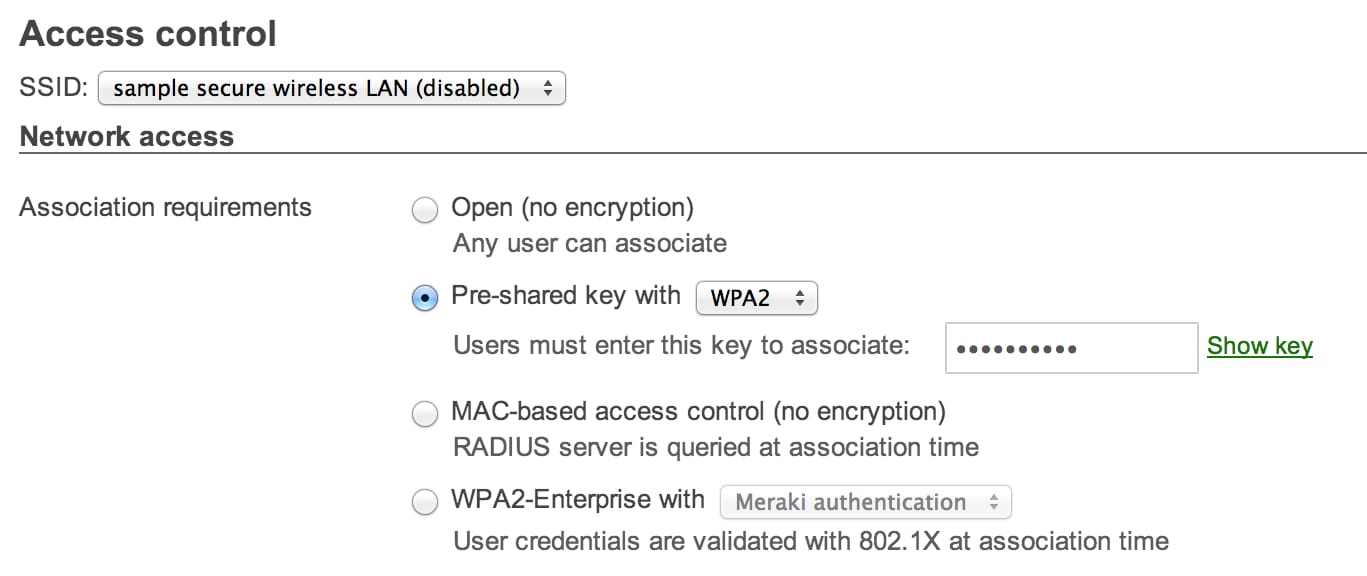
It’s possible to configure up to 15 SSIDs per network. The Configure > SSIDs page provides overview information, the ability to enable SSIDs, and renaming options. To enforce association requirements for each SSID, click on “Access control” on this page or by going to Configure > Access control. Simply select from the available options: open, pre-shared key, MAC-based, or WPA2-Enterprise.
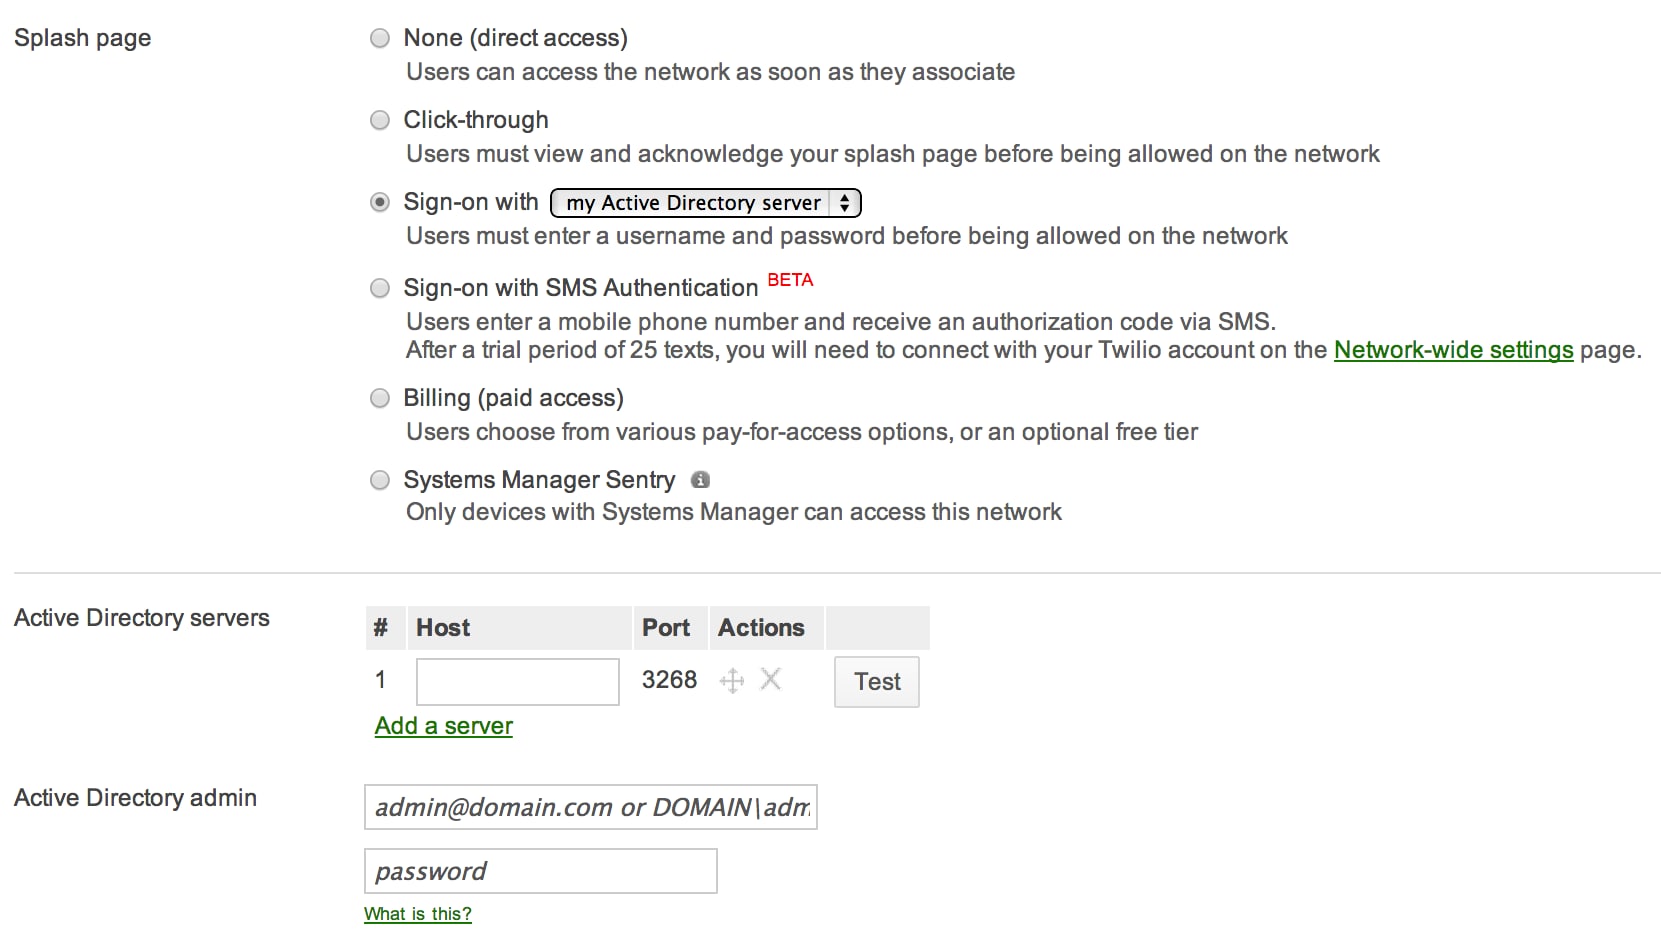
Active Directory authentication
Another association option is to authenticate using an external Active Directory server through a splash page. This is useful for preventing network access unless the provided sign-on credentials match those stored on the AD server. On the same Access control page, choose Sign-on with and select my Active Directory server under the Splash pages section. In the newly populated Active Directory servers section on the page, click Add a server and add the IP address of the AD domain controller and relevant admin credentials. It is also possible to use Active Directory as the RADIUS server in the WPA2-Enterprise setting.
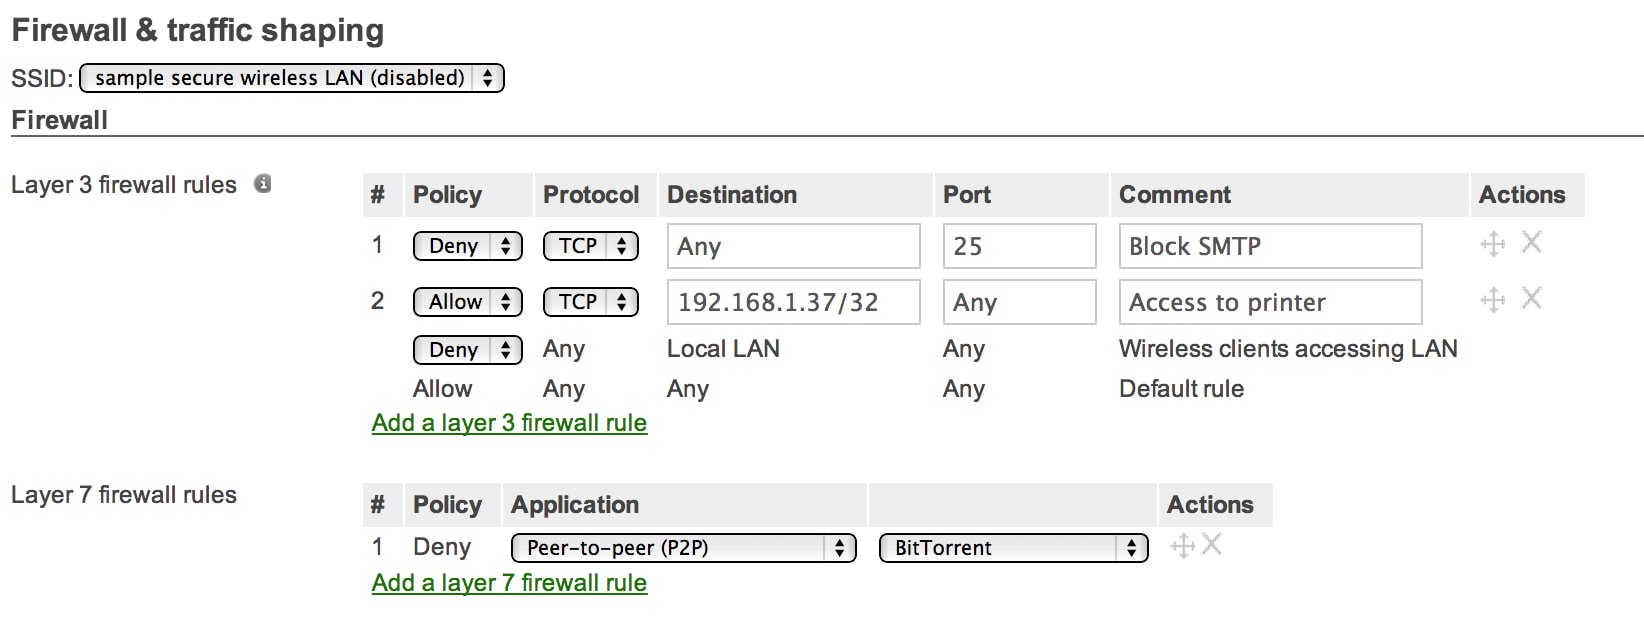
Firewall & traffic shaping rules by SSID
Now that authorized clients have access to the wireless, establishing firewall and traffic shaping rules by SSID will permit, deny, or limit each client’s use of network resources. The top section of the Configure > Firewall & traffic shaping page is dedicated to Layer 3 and Layer 7 firewalls rules. Here, an admin can set certain rules for every request sent by a wireless user that will be evaluated from the top down, where the first rule to match will be applied. Simply enter the appropriate information in the Layer 3 section or choose the application type in the Layer 7 section.
The second section of this page allows the admin to set traffic shaping rules that limit per-client bandwidth usage or can limit/open usage by application. Choose Shape traffic on this SSID under the Shape traffic section, then click Create a new rule. In the Definition section click Add + and choose the application groups or specific applications to affect, then set the Per-client bandwidth limit for those selected applications. Admins can establish numerous Layer 7 traffic shaping rules on each SSID.
Enabling Bonjour forwarding for Apple TVs
Often other wireless devices, like Apple TVs, need access to the wireless network. Bonjour is used for automatic discovery of Apple TVs on IP networks and, if on another subnet, needs to be permitted in dashboard. Cisco Meraki uses Bonjour forwarding to allow Bonjour advertisements to be forwarded between subnets. To enable, navigate to Configure > Access control and scroll to the Bonjour forwarding field under Addressing and traffic. Choose Enable Bonjour forwarding and select Add a Bonjour forwarding rule to specify a particular service that the forwarding will be limited to, e.g. Apple TVs.
DON’T FORGET…
While this blog post covered the basics of getting your Cisco Meraki wireless network up and running, customization is by no means limited to just these topics. Explore your dashboard, browse the Knowledge Base, check out our Product Documentation, or explore merakiupdate.wpenginepowered.com for even more information and features.